Nail professional Katie Barnes shares how she created the nails for Nailpro's March/April 2023 cover.
Courtesy of Katie Barnes
About The Artist
Katie Barnes (@katiebarnes.toolrange) has over 15 years of experience as a nail professional, starting her own salon in Warwick, England in 2007. But, she didn’t just stop there. She started her education journey in 2011, obtaining her teaching qualification from the University of Warwick. Katie Barnes is a nail professional with over 15 years of experience. She is the founder of the Katie Barnes Academy and founded the Katie Barnes Tool Range in 2017.Courtesy of Katie Barnes
She has won numerous nail competitions, such as Nailympia UK Top Tech Division 3, International Nail Art Master, International Nail Master and Top Tech Stiletto Nails, in addition to winning awards such as Scratch Starts Nail Stylist of the Year, Scratch Shooting Star Award, Babtac Nail Technician of the Year and Top 10 Nails Next Top Nail Artist. With over 70 awards, she stopped competing in 2019 and started coaching and mentoring nail professionals. Barnes is the founder of the Katie Barnes Academy and founded the Katie Barnes Tool Range in 2017. She is often a competition judge and contributes to many industry publications, podcasts and blogs.
Artist Inspiration
I was inspired by the soft, delicate spring and bridal shades, textures and florals. From delicate lace material to gypsophila, pearls and soft shades, we wanted to create a bridal-inspired design. Instead of using flowers to bring this image together, I wanted to create these from nail products to represent the bouquets that would be part of a wedding. Often, bridal nails are simple and short, and I wanted to showcase a soft, classic design that doesn’t have to overshadow the dress. Our model Rachael had recently got married, so she was the perfect model for this bridal-inspired shoot.
How-To:
Prep the natural nail by pushing back the cuticle and removing the shine with a 240-grit file. Then, remove the dust, and use dehydrator.
Apply nail form for an almond shape, fully closed from birds-eye view and slightly down from the side.
Use cover pink acrylic to sculpt the enhancement. Pinch if required.
File and buff into shape. Remove all dust.
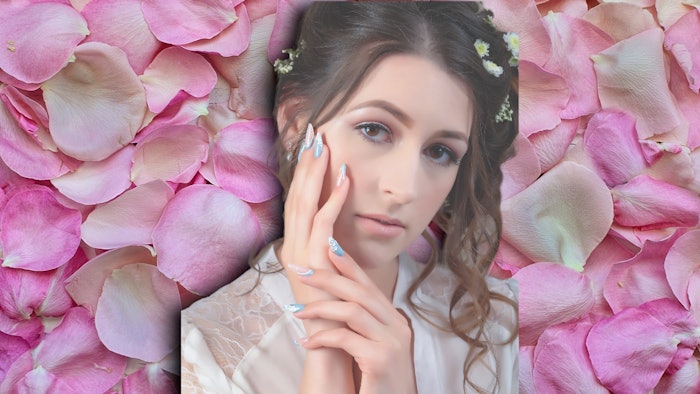
Apply two coats of the tranquil blue gel polish, curing each coat for 30 seconds. Apply non-wipe topcoat, and cure for 30 seconds. Nailpro's March/April 2023 cover with nails done by Katie Barnes.
On the ring and index fingernail, use white art gel and a fine line brush to draw stencil roses. Start by drawing two semicolons to create the center of the flower, then ensure the next petal overlaps each gap from the previous layer. Cure for two minutes. If you find the gel starts to self-level, freeze cure each flower or every couple of petals for approximately 10 seconds. To add height and a more 3D effect, layer up the art gel.
On the remaining nails, apply skin guard, and use the stamping floral plate and white stamping lacquer. To remove the residue and any dust from the stamper, use a lint free roller. Peel the skin guard off after you are happy with application and apply non-wipe topcoat. Using the same gel polish and paint as step 5 and 6, create a border around these nails. Finish by applying some pearls to the little finger.
To make the bouquet, create the 3D flowers and leaves using lace gel. To create the centre bud, pick up a bead of lace gel with a spatula, roll it in-between your fingers into a ball and apply on the back of your hand. Apply water, and use a 3D mini brush to press out into a sausage. Roll this into the shape of a bud. If you prefer, you can wear gloves. Freeze cure for 10 seconds.
Keep making petals and rolling round the inner one until you have created the size you desire. To make the petals, mix with some gel paint on a file to create the desired shade, then apply onto a fantasy form, and push into a leaf shape. Cure for 30 seconds, and remove. Remember that lace gel is very light sensitive, so keep the lid off while working to avoid the product becoming hard.
Use gem glue or acrylic to adhere the flowers to thin wire. Apply the leaves, flowers and some gypsophila flowers to the wire.
Finish with some pearls and Swarovski crystals.
The makeup artist also added gypsophila and chrysanthemums to the model’s hairstyle.
Products Used: Behind the scenes of Nailpro's March/April 2023 cover shoot.Courtesy of Katie Barnes
 Katie Barnes is a nail professional with over 15 years of experience. She is the founder of the Katie Barnes Academy and founded the Katie Barnes Tool Range in 2017.Courtesy of Katie Barnes
 Nailpro's March/April 2023 cover with nails done by Katie Barnes.
 Behind the scenes of Nailpro's March/April 2023 cover shoot.Courtesy of Katie Barnes


