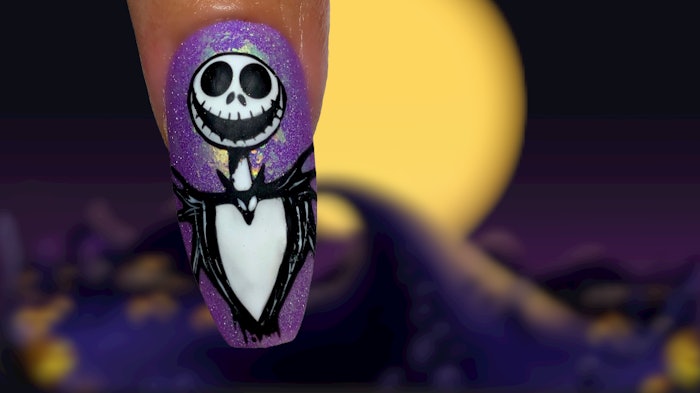
Get your clients ready for Halloween with this Jack Skellington nail art tutorial.
U.K.-based nail artist Kelly Scothorn (@asprettyas_nailsbykelly)'s nail set features the iconic Pumpkin King from Tim Burton's "The Nightmare Before Christmas."
Follow the step-by-step tutorial to bring the look to life.
 Jack Skellington nail art step-by-step tutorialCourtesy of @asprettyas_nailsbykelly
How-To:
- Apply your desired base color, then cure. Add iridescent flakes to the inhibition layer and gently pat them onto the nail with a gloved finger, or dab on the flakes with a clean brush. Apply a thin layer of matte top coat, then cure.
- Paint a circle at the top of the nail near the cuticle using a fine detailer brush and white gel paint. Cure.
- Apply a small amount of gel paint directly beneath Jack's chin, then pull the paint downward to create your desired neck shape.
- Create a flag shape for Jack's chest. Start with an outline, then carefully fill in. Cure.
- Build up a thick 'V' around the chest using a striper brush and black gel paint. Drag the gel paint downward while it's wet to create a ripped-shirt effect. Cure.
- Apply sharp, thin lines protruding from Jack's shoulders using a striper brush and black gel paint to form his signature spiky jacket. Cure.
- Again using black gel paint, paint on Jack's eyes with a detailer brush or dotting tool, then draw a smaller 'V' at the base of Jack's neck to create a bow. Cure.
- Draw a large, smiling mouth with black gel paint, and add tiny, thin lines using the very tip of your brush to create stitches around Jack's mouth. Apply two dots for nostrils, and outline the head and neck. Add a black shadow on one side of Jack's neck for dimension.
- Add faint stripes to Jack's jacket using white gel paint, and add white dots on his bow. Fully cure for 60 seconds, and finish the nail with a matte top coat. Cure one final time, and head on down to Halloween Town.
About the Artist:
Nail tech and artist Kelly Scothorn is based in Derbyshire, England. Check out more of Scothorn's work on Instagram, and see her skeleton nail art tutorial on Nailpro.


