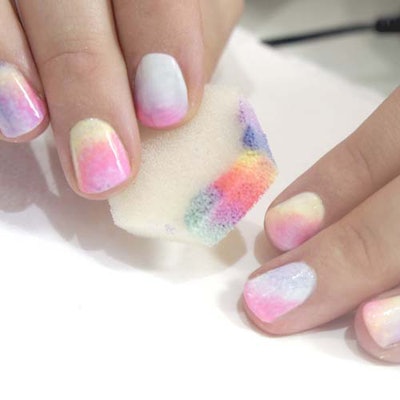
Be Creative Artisan and Orly Ambassador Sam Biddle travels around the world demonstrating how to use gel polish for nail art, and she has some great tips for making the most of the medium!
1. Keep it thin. There is temptation to apply gel polish like regular polish and to apply it with a reasonable layer, but gel polish has added elements in it, which means that when it is cured under the lamp, the nails can look big and bulbous. So keep it thin with a barely there base coat, and two to three (if you have to) polish colors. These are so thin you should be able to see the natural nail beneath as you apply the first layer.
2. When creating nail art or using lots of colous on a nail, use a small dish with a sponge (not cotton or a wipe) that is pre-soaked in cleanser. That way you can wipe off any excess gel polish from your brush cleanly.
3. Here’s a brilliant technique for getting a quick color fade with gel polish. Apply the colors on your sponge in rows, dab it first on your desk towel, and then do one quick dab onto the nail. Always create a fade over a white or light solid color, it will make colors pop more, even with the one layer of sponging.
4. Flash cures can sometimes be a forgotten method. We are used to doing this with hard gels, but this method works wonders with gel polish as well, especially if you’re painting with it. Flash curing will prevent the gel polish from settling, shrinking, and sliding around nail.
5. To make your color come alive, seem deeper and more vibrate, apply your first coat as a soft pink or white. Using a solid color like a cream or opaque pink gives the light an even surface to reflect the color, which will give your color a more opulent feel. In most cases, you need only apply one coat of your nail color if you first use one coat of your more opaque base color.
6. If you plan on creating crisp lines for nail art with your gel polish, first apply top coat and then buff off the shine. This buffed surface prevents the color from sliding around, and applying a second layer of top coat at the end will ultimately protect your designs for longer.
7. When using an acrylic paint for nail art on top of the color coats and inhibition layer (but before the top coat), choose one that is highly pigmented. This way, you can scratch away and manipulate the paint as needed, without losing opacity. For instance, when creating a leaf, you can scratch away the veins after applying the green.
8. When removing the brush from your polish bottle, take a moment to drag the excess polish off the “stick” part of the brush along the side of your polish bottle. This will force the polish into the bristles and give you the correct consistency for the whole application. You don’t run the risk of excess polish dripping down the handle part of the brush, into the brush and onto the nail. Polish collects around the handle part of the brush and then gravity will make it dibble down and floods the brush, and in turn, the nail. This tip is most helpful when using top coat and base coat.
9. One unique nail art technique you can try using gel polish is to first apply a light colored base coat, curing it, and then putting a darker color over top. Before curing, use a dotting tool to drop bits of top coat into the dark color. It will disperse sort of like a bubble and give a pebble effect to the nail. I recommend using base coat, however, as it is often thicker, resulting in crisper lines.

International Nail Artist Educator
[email protected]

[Images: Sam Biddle]


