Bellacures shares three nail tutorials perfect for the upcoming 4th of July holiday.
Courtesy of Bellacures
Bellacures nail salon is sharing three nail tutorials that will be perfect for your clients looking for 4th of July nails.
You can follow the step-by-step tutorials below to create these looks for your clients.
Red and Blue with Silver Stars
This 4th of July inspired mani is sure to make sparks fly!
 Red and blue nails with silver starsCourtesy of Bellacures
- Begin by completing cuticle care and filing your client's nails into the desired shape.
- Once this is complete, begin by applying two coats of polish to the nail beds, allowing time to dry in between each coat.
- Once your base color is dry, take some nail glue and apply it at the base of your ring finger where you would like to place the stars. If you don’t have any silver stars on hand, you can substitute with dotted silver polish or add a little sparkle with silver gems!
- Finish off the look by applying a topcoat and some cuticle oil for maximum shine.
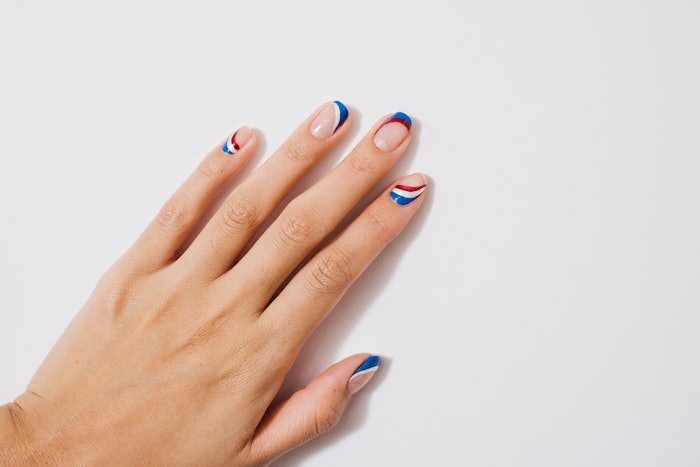
Red, White and Blue French
A classic French mani with a red, white and blue twist!
 An abstract red, white and blue French manicureCourtesy of Bellacures
- To achieve the look, complete cuticle care and shape the nails into an almond shape. This shape is universally flattering and helps to elongate the appearance of the fingers.
- After shaping and cuticle care is complete, begin by placing a sheer nude base coat. Go with a nude that best suits your client's skin tone and allow time to dry.
- Next, start applying the French tip by taking a white polish on a thin brush and painting in a swift curved motion about ¼ from the top of the nail.
- Once you’ve placed the outline, fill in the tips of the nails with the polish, making sure to not leave any gaps.
- After this is complete, repeat the same process at the base of the nails with a red and blue polish.
- Top off the look by applying a top coat and cuticle oil, and you’re ready to go!
Nude and Stars
Summer is officially heating up, and this nude mani is ready to rock any and all firework shows this 4th of July!
 Nude polish with red and blue star nail artCourtesy of Bellacures
- Once you’ve completed cuticle care, begin shaping your client's nails into a rounded oval shape.
- Next, take nude polish and apply this evenly to the base of the nails.
- Once the first coat has dried, apply a second coat for optimal coverage.
- After the base coat is finished, on a thin line brush take your red polish and draw an off centered star on both the ring and middle finger.
- Complete this same step with the blue polish, and fill in the outline of the star design.
- As always, finish off with top coat and cuticle oil for maximum shine.


