Cabinet drawers, car doors and other beauty booby traps are everywhere.
However, these mani landmines aren’t always the cause of a chipped tip.
“The most common cause of a broken nail is daily use,” says Orly education ambassador Carla Collier.
Using oil and lotion regularly to keep nails healthy and flexible is the first line of defense against breaks. Collier also advises clients to pay close attention to the way they perform daily tasks (We’ve all said it: nails are jewels, not tools!) and to use gloves whenever doing jobs that can be rough on hands, like cleaning or yardwork. Consider, too, that your client’s nails may simply be too long for her lifestyle.
“While long nails are beautiful, they aren’t always the best choice for active clients,” says Collier.
Choosing a length and shape that fits a client’s activity level, coupled with proper at-home care, will go a long way to prevent future nail emergencies. Yet even with perfect care, occasional breaks are inevitable. Keep in mind that some clients may be resistant to too much “artificial” intervention to save a natural nail, so be sure to discuss their wishes and expectations before you dive in. Your knowledge of your client (their profession, allergies to certain products, how well they care for their nails between appointments, etc.) will give you the best insight into the optimum fix. Filing down the nail as it grows out may be sufficient upkeep for minor breaks repaired with glue or a wrap, but if the nail is repaired with acrylic or gel, insist on a follow-up appointment so the repair can be maintained or removed without damaging the natural nail. Depending on the severity and location of the break, a client should expect a fix to last from one to two weeks.
Here, simple step-by-step directions for natural nail repair.
Fixing a Tear
- Lightly buff the surface of the nail to remove the shine. Be very gentle to avoid damaging the nail’s surface or snagging the tear. Then, cleanse the nail thoroughly with nail cleanser or isopropyl alcohol to remove excess oil and moisture.
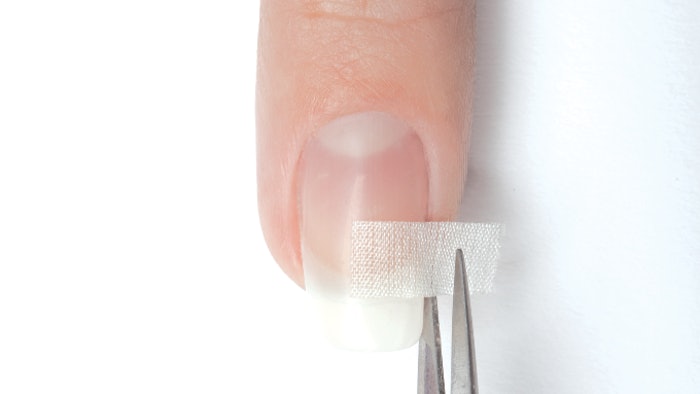
- Cut a rectangular piece of adhesive silk wrap that is large enough to cover the break. Note: Some techs choose to wrap the entire nail, but wrapping just the break will keep the nail from appearing too thick. Use tweezers to place the silk piece over the break, ensuring that it’s adhered smoothly and completely to the nail.
- Cut the silk to fit the nail.
- Next, saturate the silk with gel base coat and flash cure.
- Apply another layer of gel base coat, this time covering the entire nail. Then, cure.
- Use a 240-grit sponge file to lightly buff the surface to smooth the silk repair.
- Manicure and polish as usual. Advise the client to take special care of the nail until the break has grown past the free edge and can be trimmed easily if desired.
Fixing a Chip
- Lightly buff the surface of the nail to remove the shine. Be very gentle to avoid damaging the nail’s surface or snagging the tear. Then, cleanse the nail thoroughly with nail cleanser or isopropyl alcohol to remove excess oil and moisture.
- Apply a form. Then, using builder gel, gradually sculpt the missing corner of the nail. To ensure the extension stays put, carefully overlap the natural nail with the builder gel.
- Cure, then remove the form. Apply gel polish to the entire nail and cure.
- Use a 240-grit sponge file to lightly buff the surface of the nail to smooth the repair.
- Apply a clear coat of traditional or gel polish. Cure, if necessary, and continue with service.
-Leslie Henry is a business development executive, licensed nail technician and the blogger behind workplaypolish.com.
This piece was originally published by Nailpro in 2017.

