Nail artist Asia Bloodworth shares how to create colorful mushroom nail art using 2D and 3D nail gel.
Courtesy of Asia Bloodworth
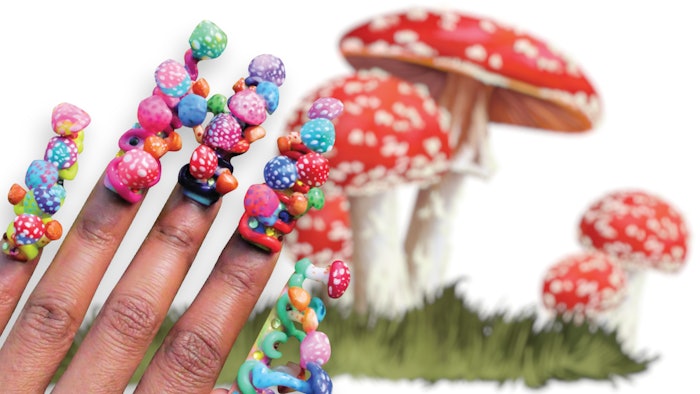
Nail artist Asia Bloodworth (@asiathabird) created a colorful mushroom themed summer design using 2D and 3D gel as well as an assortment of rhinestones.
Read below to learn how to recreate this look for your clients.
 Colorful 3D mushroom nails by Asia BloodworthCourtesy of Asia Bloodworth
Nail Base
- Begin each nail by polishing a foundation color on each nail (any color of your choosing).
- Apply a layer of blooming gel, and create a marble style design on each nail. Let the colors go in different places on the nail. Go wild!
- After using the blooming gel and creating your marbling design, add a layer of top coat.
- For the colored rhinestones, apply colorful rhinestones of different sizes of the nail. Be sure to have spacing in-between when performing the application of the rhinestones.
3D Gel "S" Vine
- Using 3D gel on a flat surface (table), begin expanding the 3D gel by rolling it with your finger or hands. This gel will expand in length to help you create your “S” vine design. You can use any color you want for your vines for each nail.
- Apply the 3D gel on each nail, performing an “S” motion, creating a squiggle-like pattern going down the nail and making a spiral design at the end. This will make the appearance of slight length to the nail.
3D Gel Mushroom
- To create the mushrooms, start by taking a small amount of 3D gel and creating a stem for the mushroom. Then, apply the created stem on top of the 3D vine design, and cure under the lamp. Don’t be afraid to apply the stem anywhere you want on the vine design.
- After creating your stem, take another amount of 3D gel, and create the mushroom tops. They can be as small or big as you want.
- Repeat steps 7 and 8 as many times as you want for your design! Tip: This is an opportunity to play with color for this design! Have fun with it! Blend colors together.
- To add harmony and more balance to your design, you can also create brown mushrooms and place them in different places on the nails. Take a brown and white color, and paint the mushroom tops.
- For each mushroom, use a dotting tool to paint the mushroom tops and stems.
- Apply shiny top coat on all mushrooms.
About the Author:
Asia Bloodworth is a licensed cosmetologist, illustrator, graphic artist, podcaster and native Washingtonian that lives in the DC Metropolitan Area. She earned her Cosmetology License in 2015 and her Bachelor of Fine Arts in Illustration from the Savannah College of Art and Design in 2019. She has her own podcast, Nails and Beauty Talk, on YouTube, where she interviews nail professionals and covers topics ranging from nails and fashion to crypto and Web3.


