How To Dry Pedicure - Erica's ATA (Step 6, reduce callus)
Courtesy of @ericasata
Erica Schlabach, owner of Erica’s ATA, shares why and how to offer dry pedicures to increase results and revenue.
Dry pedicures eliminate water from the service so clients can benefit from the following:
- Cleaner: no exposure to waterborne pathogens.
- Safer: no shredding of live tissue.
- Longer lasting: smoother feet and better product application and adhesion.
But, there are benefits for the nail pro, too:
- Increases profit: Differentiate yourself with a results-driven service.
- Less body strain: Dry pedi techniques replace the repetitive, manual work of hand filing/exfoliating.
- More efficient: Get better results in the same or less time.
Dry Pedicure Steps:
- Cleanse the feet: Spray the feet with foot deodorant to eliminate microbes, or use a damp towel with mild soap.
- Spray callus softener to the bottoms of the feet: Callus softener is a urea-base product. As it is not an acid-base "remover" product, no need to wipe it off. The softener will begin to break down dead skin cells so it is easier to reduce callus in the following steps.
- Cut and shape the toenails: Use a cutter that has good visibility, and take small cuts across the nail. Be sure to cut from edge to edge to avoid developing a spicule (a small piece of nail corner embedded in the skin).
- Gently push back cuticle: Push gently with a metal pusher to release dead cuticle off the nail plate. Do not ram the pusher into the proximal nail fold. Skip this step if desired.
- Exfoliate cuticle: Use a 100% diamond bit with flat sides to gently flake away dead skin cells off the nail plate. Move the bit parallel to the nail plate, working left to right with the e-file in the reverse direction. (P.S. Diamond bit techniques work the same for left- and right-handed techs!)
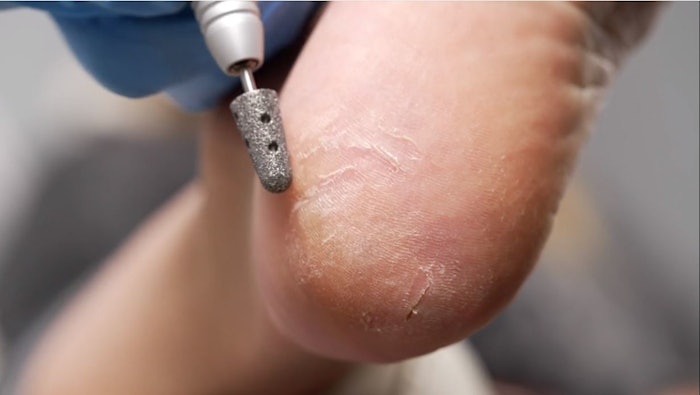
- Reduce callus: Use a 100% diamond pedicure bit to exfoliate the bottoms of the feet or anywhere with callus or heel cracks. Run the e-file in either direction at a high RPM. Focus working on controlled areas, but be sure to keep the bit moving. Client comfort is a priority so stay in communication with them by asking, “How does this feel?” or saying, “If you feel any warmth, please let me know.”
- Apply polish or gel: Follow the usual procedure for product application.
- Moisturize and massage: Use preferred moisturizing product to massage into the feet.
Be sure to suggest a retail product for at-home use so that clients can continue to keep their feet healthy and hydrated!


