Nail educator Paola Ponce (@paolaponcenails) shares tips for how to create a liquid chrome ombre nail look that your clients are sure to love.
Liquid chrome… a fading trend? Maybe. But it is one that will resurface again, guaranteed.
So today, I’ll be sharing a tutorial using liquid chrome to create a super aesthetically pleasing natural nail mani.
Before we get into the details, it is important to note that you will need a bit of length to the nails you’ll be working on. So if you don’t already have a good length to your natural nails, do consider adding some length artificially with extensions (my favorite medium for a natural look is using potted soft gel to extend and build).
Whether you go with a natural nail overlay or extensions, you’ll want to make sure your nails are beautifully structured, and that the top of those nails are nice and smooth (otherwise, the chrome will also reflect bumpy and uneven).
You’ll really enjoy this design, and you’ll also enjoy using chrome liquid.
Before we get into the step-by-step here are all the materials you will need:
- nude color
- liquid mirror chrome
- base gels
- makeup sponge
- lint-free towelettes
- 90% alcohol
How-To:
1. Prep and clean the natural nails.
Remove any old product and smooth your nails out, then do your cuticle work, and get them nice and clean ready for product application. Reminder: The surface of the nails you are working on (whether natural or extended) must be nice and smooth. You can do that via a structured overlay application or by extending the natural nails.
2. Apply your base gel.
Your “base layer” at this point is whatever medium you will be using on your nails. A simple gel manicure, a structured overlay or extensions.
3. Apply your color.
After clear gel application, I applied two coats of a natural nude color. You can use any color for this design’s background, but I recommend a more muted option that does not take away from whatever liquid chrome color you will be using.
4. Apply liquid chrome.
To start working with the chrome liquid, apply one coat of non-wipe topcoat to your nails, and cure in the lamp for 60 seconds. The chrome will burnish nicely on a fully cured non-wipe top gel to burnish on very smoothly.
Next, the liquid chrome requires you to use a smooth makeup sponge. If the pores on your sponge are too big, the burnishing may end up patchy, and you will have to use more liquid.
To begin burnishing, you will paint the sponge’s edge with the liquid chrome brush. Next, fold the sponge and start dabbing the edge of the nail with the sponge. We are going for a gradation look, so gentle pats upwards is the key here. Do this one nail at a time, as the liquid can dry up if you put it on all of the nails at once.
Once you have the gradient effect going on, with the same sponge and area of the sponge you were using, start burnishing the nail. Start at the free edge and feather as you work your way up. If you go over a little bit, don’t worry at this point your sponge won’t be releasing any more product. You can touch up the other nails and ensure the free edge is the most concentrated area.
If you feel you messed up somewhere, no worries. Grab a towelette, damp it with alcohol, pat areas where you messed up and try to keep it off the skin. You can do that if you feel like you need to start over. This dissolves with alcohol, so you can remove some or all of it.
5. Use alcohol to make your liquid chrome shinier.
This is the trick! After you are happy with the liquid chrome placement, use a towelette, spray it with alcohol, and float it over each nail. This step is going to make the chrome effect shinier.
6. Get a little extra with it.
It may seem a little extra, but adding small embellishments really upgrades these nails. I usually go with studs or small crystals, but I found these flat sparkle emblems that really give this gradient manicure all the feels!
If you don’t have something like this, you can paint the sparkle emblems yourself.
To adhere you must use a super sticky gel then one with a slightly thicker viscosity to seal your pieces in.
I’ll use my liner brush to paint a tiny amount of gel on the nail where I will place the sparkle emblems.
Use your crystals tool to grab the metal pieces and the other side to correct the placement. Use a flash curing unit to flash cure the embellishments and move to the next nail. Do one nail at a time, so your decorations don’t keep moving.
Unless your small curing unit specifically states it fully cures your gel nails, use your compact unit to flash cure. Gel hardens at 50%, but that doesn’t mean it’s fully cured, so if you cure incorrectly, you could have uncured gel on the nails.
7. Seal it to make it last.
I like to double-seal anything burnished on top of my gel nails. You could use two layers of top gel if it is the non-wipe type or a base layer followed by top gel.
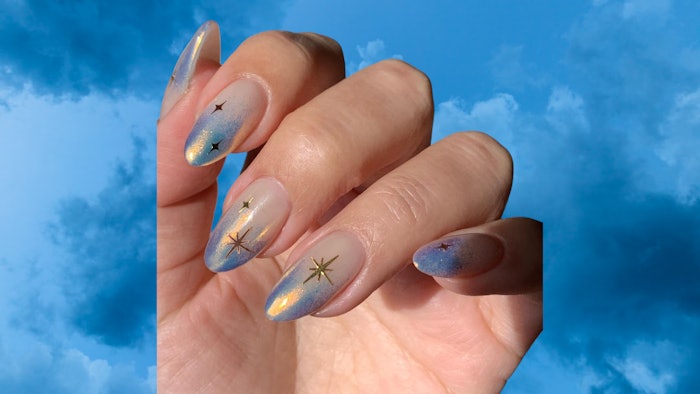
That is it! I am really pleased with how this came out. I am not a super fan of blue nails, but this is a beautiful blue chrome sheen finish. These nails give me "Frozen" (yes like the movie), metallic blue vibes. Hope you get a chance to recreate this look!
About the Author:
Paola Ponce is a nail educator focusing on topics of soft gel and entrepreneurship. She hosts a weekly episode around these topics on her YouTube Channel @paolaponcenails.


