One of the things that clients love about nail art is that it gives them a unique set of nails that were created just for them.
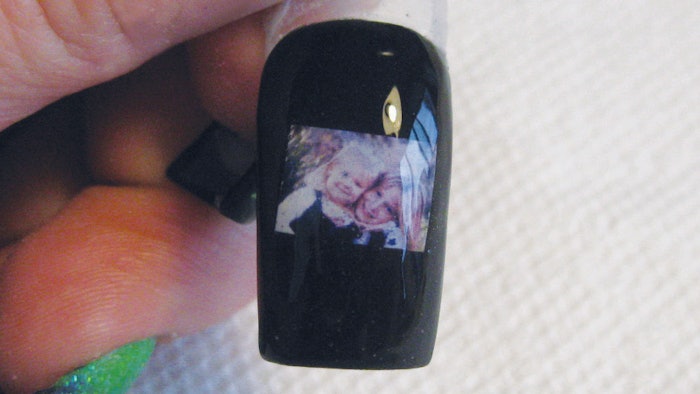
We’ve seen photos on mugs, cell phone cases, T-shirts and calendars, but have you considered photos on nails? Don’t limit this design to your older clientele who carry photos of their grandchildren in their wallets. The key is to sell it to your clients correctly. Perhaps a teen would like her celeb crush or a bride-to-be could display her fiancé. How about a dog-lover and her pup? You’re only limited by your imagination—and your clients’ interests.
Olivia Gordon, a nail tech at The KRU in Lancaster, California, employs embedded photos in her services and shares some of her tricks with Nailpro. The first step is getting your hands on the photos themselves.
“I have my customer text or email me a picture, then I print it out,” says Gordon.
You don’t have to be an IT genius to format the photos; all you need is your computer and a basic photo-viewing program (which many computers come with these days). Shrink the photo to the smallest possible size and print it out.
“My printer can print out a sheet called a ‘contact sheet’ under settings. It will print out the smallest photos on one sheet of paper. I use the 4×6 paper setting; it fits the most pictures, printing them as small as possible," Gordon explains.
Choosing the right kind of paper is also important. Gordon has found that using the least expensive photo paper generally works best because it’s the thinnest. Regular photo paper doesn’t work as well because it absorbs the ink differently.
Once you have your teeny photos, you have a few options as to how you’d like to cut them out. You could use small scissors or an X-acto knife.
“[I like to] use a hole punch designed for scrapbooking because it’s small enough for a nail but big enough to fit a photo,” Gordon shares.
There are many different sizes and shapes of scrapbooking punches beyond circles, such as hearts or stars, and they make creating fun silhouettes really easy.
Bring your cutouts to the salon and save them in an envelope or small box until your client’s appointment. Then, it’s just a matter of embedding them into the nail.
Embedding photos into nails will create uniquely personalized new looks for your customers. Use your imagination (and theirs!) to fuel and inspire you—then run with it!
Prep Steps
- Print the photos you want to embed using the thinnest photo paper possible.
- Cut or punch the images out to the proper size and desired shape.
- Have your client wash her hands while you wash yours. Then, prep the nails as usual.
- If using tips, apply them and refine now. Refining the tip (or thinning them) is an important step to keep the nail from becoming too bulky during the embedding process.
- Apply acid-free primer.
- Shape the photo by bending it around a brush handle or C-curve stick. This will keep the photo from popping up from the surface of the nail.
Acrylic Application
- Apply a thin layer of acrylic. Quickly set the photo into the acrylic. Hold it in place with tweezers or an orangewood stick until the acrylic starts to set around the photo.
- Once the acrylic is dull-looking, you can press your C-curve.
- Embed the photo completely with clear acrylic working with a fairly wet consistency. Sculpt the top layer as though there were no need to file, taking care not to pile the acrylic on too thick. Check your liquid to powder ratio; if the product is too dry you’ll end up with air bubbles. Experiment with different brands to find the clearest, bubble-free application.
- Choose a 180-grit file or medium E-file bit. Shape the nail carefully with a medium touch; you don’t want to file through the acrylic into the photo. If you’ve sculpted the nail correctly you should only have to smooth and perfect your shape.
- Apply polish around the photo and decorate any way you like. Finish with top coat or gel sealer.
Gel Application
- Apply a thin layer of builder gel or other thicker-viscosity gel. Cure for two minutes between each layer. Tip: If using a color or glitter gel, apply a thin base, then cure. Next, apply the color glitter layer, and cure. Finally, apply a thin, clear building layer over the glitter taking care to keep the applications very thin. Cure.
- Remove tacky residue with a lint free wipe and alcohol or recommended cleanser.
- Carefully file and create the nail shape. Remember to keep this part fairly thin.
- Dust the nail thoroughly and cleanse with acetone or recommended cleanser.
- Using brush-on glue or thin resin, adhere the photo to the surface of this thin gel enhancement. Rub a thin piece of plastic over the photo surface to remove any bubbles and to prevent any puckering that may occur, the same way you would for a wrap. Allow it to dry.
- Apply a clear hard gel over the photo and entire surface of the nail. Choose a gel that is self-leveling with a medium viscosity. Cure. Remove the tacky layer, buff and decorate with gel polish or hand paint, if desired. Apply a gel top coat. Cure. Remove the tacky layer if necessary. Tip: Use a hard gel top coat for strength.
This piece was published by Nailpro in 2016.


