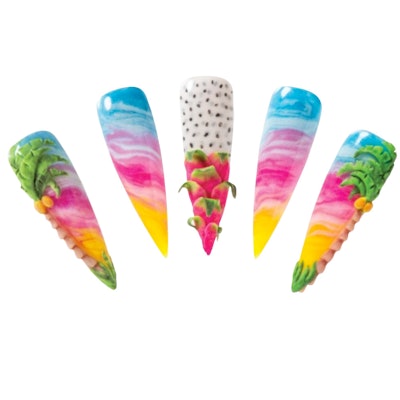
Known for its striking seascapes, sacred temples and delectable dishes, the Indonesian island inspires 3-D nail designs created by Leeds, United Kingdom-based artist Bethany Stockell. “Bali’s romantic sunsets, exotic fruits and island textures heavily inspired this marble set,” she says.

RELATED: Create a Marble-ous Nail Design with Christrio Nail Ink
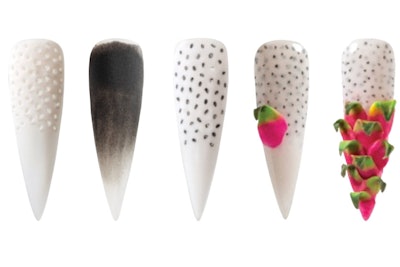
Step 1. Apply a thin layer of soft white acrylic over three-fourths of the nail using a medium ratio. Use a sharp tool to poke seed-sized holes into the nail.
Step 2. Apply a bead of black acrylic over the white, ensuring that the acrylic sinks into each hole.
Step 3. File the black acrylic until you reveal the white layer
and black specs. Repeat steps 1 through 3 to create depth and dimension. Cap with clear acrylic. File and shape the nail, and apply top coat.
Step 4. Sculpt a dragon fruit leaf using deep pink, yellow and green acrylic on a sculpting form. Allow it to set. Dip a small 3-D brush into monomer and swipe the bristles underneath the leaf to gently remove it from the form. Adhere the leaf to the nail, moving it into place as it continues to set.
Step 5. Repeat step 4 until you have enough leaves to cover half of the nail. When placing each leaf, alternate the direction of the tip for a more organic look.
RELATED: Moroccan Architecture Inspire Swoon-worthy Tips
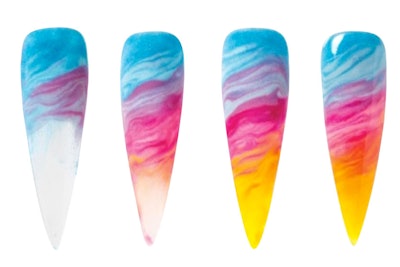
Step 1. Decide how many colors you want to marble; here, I used eight. Apply a small bead of the first shade of color acrylic at the base and sidewall area of the nail. Then, apply a small wet bead of the first and second colors next to the first.
TIP! Applying beads separately gives you more control over blending and marbling.
Step 2. Pull and swirl the colors through each other diagonally in a loose “S” shape with an acrylic brush without adding pressure for a natural marble flow. Use care not to overwork or overblend the colors.
Step 3. Slightly overlap and blend the previous section with the next color, until the nail is complete. Use the tip of the brush to feather the end of the color acrylic to prevent the nail from becoming too thick when overlapping each section of color.
Step 4. After you achieve the desired look, cap the nail with clear acrylic. File, shape and apply top coat.
TIP! To achieve maximum clarity when encapsulating any acrylic design, use a medium-to-wet bead, and let gravity do the work whilst gently tapping the bead to guide it to the tip of the nail to avoid air bubbles.
–by Angelina Lewis
[Images: Courtesy of Armando Sanchez; Unsplash; Ami Park]
This story first appeared in the July issue of Nailpro magazine. To receive the magazine, click here to subscribe.


