Bring out the baubles and bubbly!
It's that special time of year when clients request fun and dramatic New Year’s nail designs. To give you some inspiration during the busiest time of the year, we tasked leading nail artists with creating New Year’s Eve-inspired designs using 3D elements. Here are their festive creations along with their top tips.
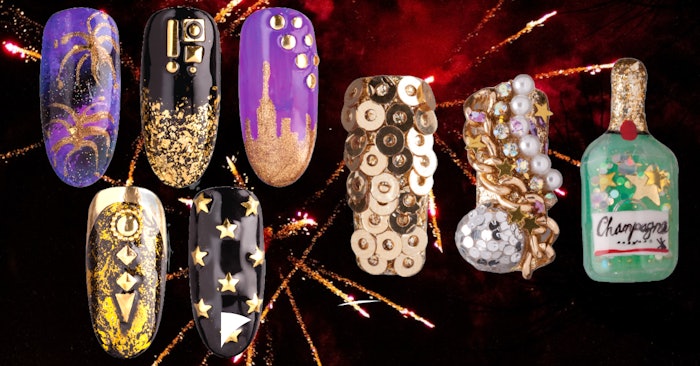
City Nights by Reina Santos
 Photography by Jason Bennett
Want to take a walk on the wild side this New Year’s Eve? Spiked embellishments can add a modern edge to even the most understated polish job. Santos urges techs to use caution when working with studs, though, as the pointed tip can make them difficult to apply. Santos uses a wax pencil to pick up the stud and resin for maximum adhesion. “Resin can dry quickly depending on the temperature of the room you’re working in, so I always apply a tiny amount and work in small sections,” she says. Then, she encases the studs in gel top coat to soften the pointed edges. But use caution: “Applying too much gel top coat will take away from the 3-D effect,” she warns.
Art Deco by Design by Yvett Garcia

When it comes to bling on New Year’s Eve, the bigger the better. Inspired by the decadent styles of the 1920s, the oversized gems found in this eye-catching set are not for the timid or accident-prone. To keep large gems on the nail, Garcia uses gel designed for use with 3-D embellishments, instead of a standard builder gel, to ensure staying power. “I also apply resin around the stones for extra hold,” she says. Garcia insists that strategic placement is key when working with oversized gems, noting, “Always start with the bigger stones, placing them in the center of the nail or near the cuticle, then work your way out toward the free edge.”
Lady in Red by Paola Ponce

Encourage clients to go glam with colorful metallic accents. When working with charms, Ponce recommends using a clear builder gel for maximum adhesion, adding, “Have your client tilt her finger while curing in order to make sure the light cures all of the gel.” Resin is also great for attaching charms, she says. “But,” she adds, “it’s important to make sure that you cure the nail and buff and cleanse the surface before you apply it.” Though the application may be easy, Ponce finds that charms are prone to falling off if they’re not properly adhered. “When applying charms, do not leave any of the edges exposed, as your client may find it uncomfortable and begin picking at it,” she says. “Always give the charm a little tug to ensure that it has been properly adhered to the nail.”
Glitter Lights by Lauren Wireman

For clients with more subtle tastes, consider offering a glitter embossed design. This technique adds dimension without having to worry about embellishments catching on anything or popping off. To create a raised design, Wireman uses a thick viscosity gel; anything thinner can self-level, making it fall flat. She also believes that a good brush is key: “For this design, I used a medium striper brush that has the right amount of bend for creating swirls,” she says. And when it comes to picking up product, Wireman urges techs to not be afraid to load the brush. “You should have enough gel on your brush to be able to paint the design in one fluid movement,” she says. “You don’t want to run out in the middle of a swirl, so if your brush dries out before you complete a stroke, use more than you’re used to working with and I promise you’ll see a difference.”
Precious Gems by Fariha Ali

Ideal for clients who work with their hands but want a 3-D design, gel gemstones add dimension to the nail without the risk of anything catching or falling off. To create the luxe stones found in this look, Ali applied two coats of black gel polish as the base, then added gold stickers to the nail to serve as the “frame.” Next, she applied a large bead of purple gel to the inside of each sticker, and cured it. When it comes to choosing the right product, Ali recommends using a textured gel, adding, “Many formulas feature tiny stones or opals in them, which work great for creating gems.” The gel’s self-leveling formula and ultra-thick viscosity are key to achieving the smooth, glossy surface. “If you feel that the gel you’re working with is too runny, just apply the color to the nail. Then, place a large bead of clear builder gel on top of it to create the 3-D effect,” says Ali. “I like designs that call for custom gemstones, as there’s no chance of them falling off the nail since they’re built right into the polish application.”
Poppin’ Bottles by Britney Tokyo

Can’t find a gem or charm that fits the overall theme of your design? Follow Tokyo’s lead and sculpt your own embellishments with acrylic. Tokyo’s secret for creating the multi-dimensional look? “I like to mix monomer with a little brush cleaner for maximum control,” she says. But sculpting the acrylic into the desired shape is only the first step; sometimes the real difficulty lies in getting the embellishment to stay in place. So, Tokyo recommends encapsulating all 3-D acrylic creations with no-wipe gel top coat. Another tip? Advise clients to be mindful of their hands, as acrylic designs can be extremely delicate.
Follow Nailpro on Instagram and subscribe to our free daily newsletter to receive the latest news for nail professionals.


