Get a tutorial to create Lucky Charms nail art from nail artist Mayra Jones.
Courtesy of @yayasnailstudio
St. Patrick's Day is fast-approaching. If your clients are looking for a nail set to help them feel extra lucky this year, look no further!
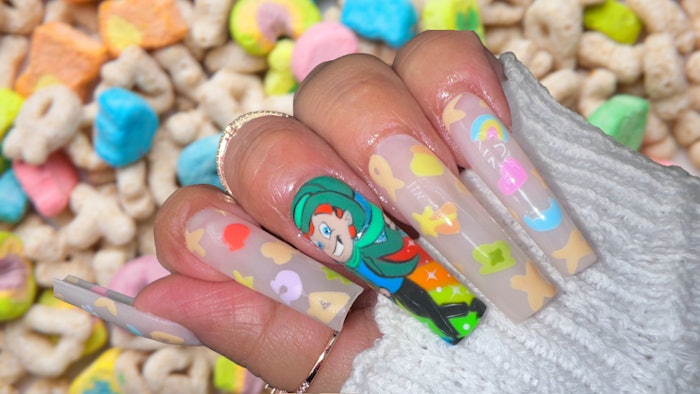
Nail artist Mayra Jones (@yayasnailstudio) created a Lucky Charms-inspired nail set, featuring the cereal's mascot Lucky the Leprechaun and several of the iconic marshmallow charms. She shared her how-to with Nailpro, and we're sharing with you!
Learn how to create this look for your clients with the tutorial below.
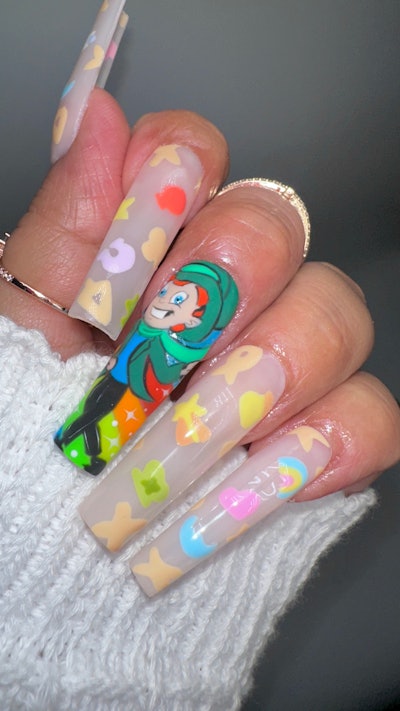 Lucky Charm nails by Mayra JonesCourtesy of @yayasnailstudio
Tools Needed:
- Alcohol
- Lint-free wipes
- Dappen dish (for alcohol)
- UV/LED Lamp
- Detail Brush
- Fine Line Brush
- Dotting tool
- Nail file 100/80 (for shaping)
How-To:
*Remember to cure each gel coat for 60 seconds.
- Prep nails. Always make sure your nails are properly prepped and cleansed from debris and oils prior to polish application. – I wipe my nails with alcohol to make sure they are squeaky clean!
- Apply two coats of desired sheer nude polish to nails with cereal art. I used Cashmere by The GelBottle. For the nail with Lucky the Leprechaun, apply two coats of sky blue polish. I used Milky Blue by DND. Don’t forget to cure each coat!
 Steps 3-6 for Lucky the Leprechaun nail art.
 - On the blue nail: we will start with the rainbow, as that will be part of the background for this nail. You will need blue, green, yellow, orange and red polishes. To avoid mixing colors: draw three colors of the rainbow (make sure these colors are separated from each other to add remaining colors) using your go-to liner brush – blue, yellow and red – and cure. After the nails are cured, add green and orange polish, and cure again. For this step I used LuxaPolish Ultra Liner Brush and Valentino Beauty Pure Gels: 093 Blue, 034 Green, 039 Yellow, 058 Orange and 005 Red.
- Once the rainbow is cured, start sketching Lucky Leprechaun with your favorite liner/detail brush and black gel. For me, it was easiest to start sketching his top hat and face, then body. I used Valentino Beauty Pure 048 Black. *Sketching hack: It’s ok to cure in sections. It prevents you from starting over when making mistakes. Once the leprechaun is fully sketched and cured, move to next step. I sketched his face AFTER step 7.
- Using your favorite detail brush and your desired deep green gel, fill in top hat and blazer jacket. Fill in his trousers/lower body with black, then cure. I mixed two colors for the perfect green shade with Valentino Beauty Pure 033 Drown and 081 and applied using LuxaPolish Detail Liner Brush. *You may need to repeat this step if colors are not completely opaque.
- Fill his shirt with medium blue, and fill scarf and band on top hat with a medium green. Cure. I used Valentino Beauty Pure 093 Blue and DND “Forest Green."
- Fill his skin (face and hands) with complexion color of choice. Cure. I used Valentino Beauty Pure 013.
- Sketch his facial features, ear and hair. Cure. I used same brush and gel from step 4.
- Fill his hair with ginger orange, and cure. I used Valentino Beauty Pure 041.
- Fill his eyes and teeth with white. Also, draw some twinkle stars around his body with the same white. Cure. I used Valentino Beauty Pure 045 White.
 Steps 11 and 14 for Lucky the Leprechaun nail art.
 - With dotting tool, apply light blue for color of eyes. Cure. I used Valentino Beauty Pure 095 mixed with Makartt Blueberry Bubblegum Jelly for the perfect shade of blue.
- With dotting tool, apply black pupils to eyes. Cure.
- With dotting tool, apply white dot on eyes for reflection. Cure.
- With your liner/detail brush and black gel, outline Lucky’s entire body and add details (his scarf, jacket, top hat, etc). Cure.
- Apply top coat – I used Valentino Beauty Pure Non Wipe Matte Top Coat. *If using matte top coat: Prior to applying matte top coat, wipe the entire nail with alcohol and lint free wipe, to remove excess pigment and inhibition layer. This prevents streaking when applying the matte top coat.
- On remaining nails, with your preferred brush and your cereal color of choice, draw the cereal shapes over each nail, remembering to leave room for magic charms. Cure. — I mixed Valentino Beauty Pure 013, 045 and 081 for the perfect cereal color.
 Steps 16 and 17 for cereal and marshmallow nail art.
 - With your favorite detail brush and pastel colors of choice, draw magic charms on each nail. Cure. — I used all Valentino Beauty Pure shades, as follows: 020 Light Red, 027 Light Blue, 082 Grinch Green, 022 Light Purple, 006 Pink, 038 Yellow and 045 White. Some magic charms require a second color. Apply, and cure.
- Apply your desired top coat. I used Valentino Non-Wipe Top Coat. You are welcome to use matte as well!
- For a crisp, sharp look, file free edge with 100/80 file — This is best for square nails!


