Bellacures shares three Valentine's Day nail design tutorials, so you can make sure your clients love their nails this season.
Courtesy of Bellacures
Valentine's Day nails call for reds, pinks, hearts and more!
Make sure your client loves their nails this Valentine's Day with three tutorials courtesy of the nail salon Bellacures. You can get the how-to for these looks below.
Red and Nude Ombre
 Red and nude ombre nail lookCourtesy of Bellacures
- Apply a pale nude polish to the middle and ring finger. If you’re looking to add more color, feel free to change out this nude to a baby pink!
- After applying two coats of nude polish, paint the rest of the nails with a muted cherry red polish.
- Once you’ve applied two coats of this to the rest of the hand, take the same cherry polish on a sponge and dab lightly toward the bottom of the nail bed of the middle finger. You want this ombre to be as gradient as possible so the higher you bring up the color, the lighter the pressure.
- After you’ve finished this, repeat this process on the ring finger beginning at the top of the nail bed instead. Clean any excess polish that may have gotten on your cuticles from the sponge with some acetone.
- To refresh and rehydrate the look, apply your favorite topcoat, along with some cuticle oil to restore hydration!
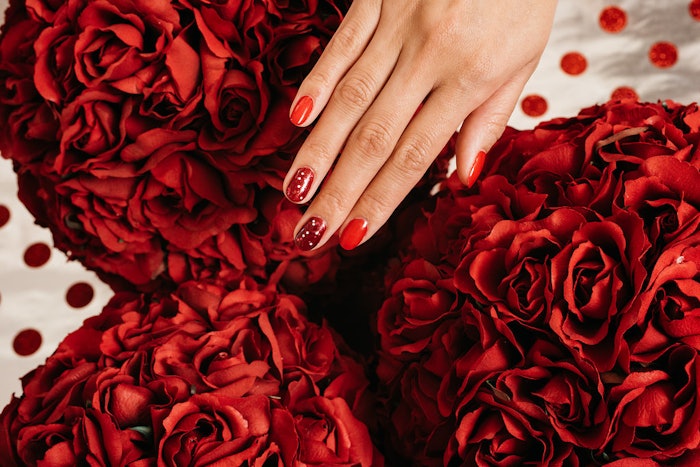
Polka Dot Pink Heart Design
 Polka dot heart designCourtesy of Bellacures
- Begin with cuticle care, and filing the nails into an almond shape. If your client wants a similar nail length but can’t achieve the look with the current state of their natural nails, opt for nail enhancements like Gel-X, Gel Builder and Acrylics. An almond shape will elongate the appearance of the fingers, but this design can be achieved no matter what shape you choose!
- Once you’ve achieved the desired shape, apply two coats of a sheer baby pink polish.
- When this has dried, begin by taking a dotting tool to your ring finger with three different polish colors. You can interchange these colors in any way you’d like to emulate this chic polka dot design.
- Using the same dotting tool on the rest of the fingers, place two slightly spaced dots of hot pink polish at the base of the nail bed. Using a thin line brush, drag the excess polish from these dots to a center point to make the shape of a heart, and fill in any gaping.
- Next, place two dots in a line at the center of the heart using two different polish shades from the polka dot design to tie the look together.
- As always apply a clear top coat for maximum shine, and finish off with cuticle oil!
Triangle French Tip
 Triangle French tip nail designCourtesy of Bellacures
- Once you’ve completed the necessary cuticle care, begin by shaping the nails into a rounded almond shape.
- When you’ve achieved the desired shape, apply a coat of clear base polish. However, if this feels a little too naked, and your client is looking for a little extra pizazz, feel free to use your favorite sheer nude polish as a base instead.
- Allow time to dry, and begin on the design by taking a thin brush and applying a dazzling neon color in a triangular motion. Start your line a quarter of a way down the nail bed, and drag upwards in a diagonal motion to the center tip of the nail. Repeat this process on the other side of the nail.
- Now that the outline is complete, fill in the rest of the tip with the neon polish.
- To top off the look, apply a top coat for maximum shine, and finish off with some cuticle oil!


