Nailpro just had to have the how-to for this delicious Cookie Monster nail design created by Alex Langhorne (@alexdidthem).
Take a bite out of her tutorial below!
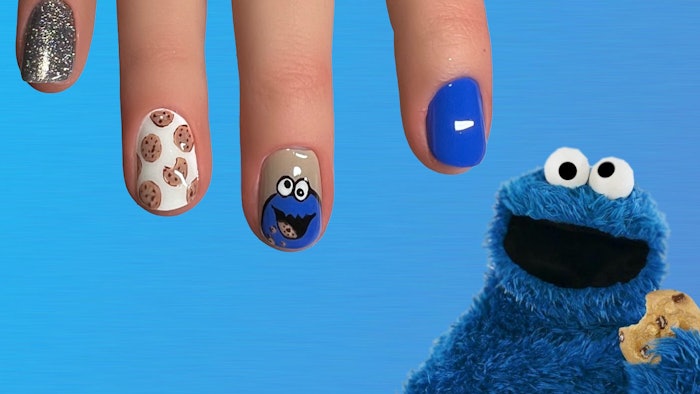
Cookie Monster Nail Art
 Step-by-step for Cookie Monster nail art
1. Apply a base color and cure. Langhorne used the same blue as the Cookie Monster for her base color, and paired that with white and a glitter to make her set pop.
2. Create a circle-like shape on the end of the middle nail, connecting free edge to side walls and going about halfway up the nail, depending on its length and shape. Cure.
3. Draw two white circles midway through the nail at the curved blue edge to form Cookie Monster's eyes, then cure.
4. Line Cookie Monster's face and eyes in black gel paint, then cure.
5. Add a deep, curvy “U” to form the bottom outline of Cookie Monster's mouth, but create “V” shapes across his top lip to give the illusion of his fur. Fill in his mouth, and dot in his eyes using black gel paint. Cure.
6. Don’t forget to add a cookie in his mouth. Bonus points for messy crumbs falling down his face!
7. Finish with your desired top coat, and cure!
Cookie Nail Art
 Cookie nail art step-by-step
1. Paint on small circles using tan gel paint. Cookies are not perfect, and these circles don't have to be, either! Make sure to leave a bite out of one or two!
2. Wiggle and dot a lighter tan gel paint into the cookie shapes to create dimension and texture. Cure when you feel your design is just right!
3. Finish the cookies with a deep brown gel paint, one that isn’t too red in color. Slightly outline the cookies with this brown, leaving your outline slightly messy and loose for a genuine cookie vibe.
4. Apply chocolate chip dots on the cookies using the same deep brown color. Different sizes and shapes look better. Cure.
5. Finish with your desired top coat!
Thank you so much to Alex for sharing the process behind her design! Check out her nail set in action below.
Follow Nailpro on Instagram and subscribe to our free daily newsletter to receive the latest news for nail professionals.


