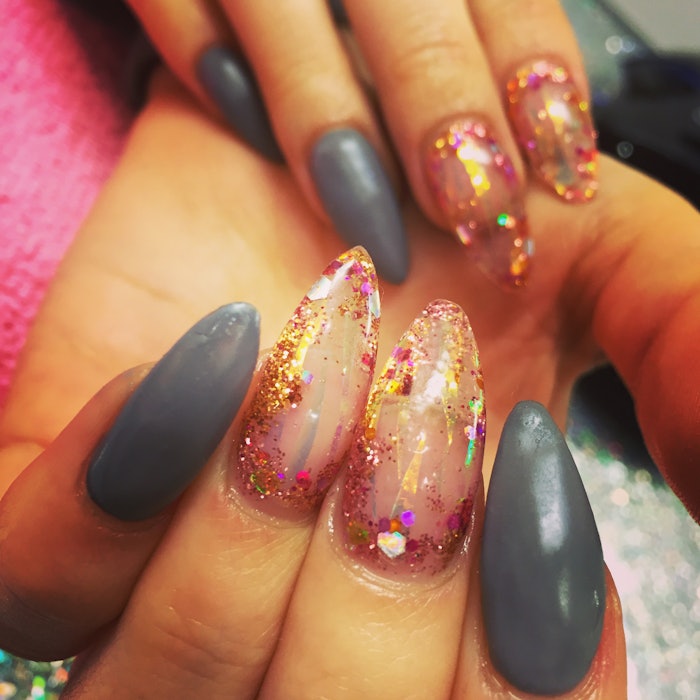
Capture the contrasting beauty of glitter and grey with this spirited design by Georgie of Distinct Nails (@distinctnails). Using gels and sunset inspired colored glitter, this look will leave your client’s hands looking chic and bright. See the salon’s step by step tutorial for the look.
Supplies Needed:

- Artistic Nail Prep
- Artistic Opening Act
- Artistic Rock Hard in Groupie
- Artistic Rock Hard in Get Bent Nail Forms
- Artistic Rock Hard – Hardcore Clear LED gel
- Artistic Oval Gel Brush
- Angel Paper
- Pink, Rose Gold and Orange Glitter
- Artistic pro 30 LED lamp
- 180/180 files
- White Block
- Artistic Colour Gloss in Temperamental
- Artistic Rock Hard in Headliner
- IBD Gel Mattify
- Artistic Revive Cuticle Oil
Step 1: Prep the nails.

Step 2: Put the forms on all fingers and apply the Groupie Base Coat.

Step 3: Build the extension off the natural nail, making sure it is thin.

Step 4: Build the extension on all nails to look like this:

Step 5: Cut tiny shards off the Angel Paper.

Step 6: Put a thin layer of gel onto the nails you want to apply the Angel Paper to, arrange them how you want and cure.


Step 7: Put another thin layer and apply glitter.

Step 8: Cap the whole nail with more gel and cure.

Step 9: File the nails into the shape you desire and smooth out, paying close attention to the cuticle area.

Step 10: Paint the rest of the nails with Soak Off Gel Colour in Grey.

Step 11: Apply Matte Top Coat to the grey nails.

Step 12: Add the Headliner Gel Top Coat to the glitter nails, cure again, cleanse all the nails then apply cuticle oil.

Step 13: Voila!

Images: Georgie at Distinct Nails


