The advantages of acrylic enhancements are many: They’re strong, durable, quick and profitable. Liquid-and-powder also offers many clients a precise fit at any length. However, this service isn’t without challenges. Form placement, proper mix ratio, smile lines and more can be difficult to master—even for veteran techs. So, we asked experts to share their best advice on all aspects of working with acrylic, from determining which clients make good candidates to brush selection to proper removal.
Candidate Clients
You can never be 100-percent sure that acrylic enhancements are the perfect fit for a client. “But one thing you can know for certain is the condition of their nails,” says Amy McPherson, director of education for Americanails. “Never apply acrylic enhancements to damaged or unhealthy nails, no matter how much the client wants you to,” she says. If your client’s nails are in good shape, determine how hard she is on her nails and if she’s dedicated to returning every two to three weeks for maintenance. “Acrylics will always be the better choice for someone who is hard on her nails,” says Terry Burciaga, educator for SuperNail.
Prep & Prime
Nail primers work on a molecular level to create a strong bond between the natural nail and the acrylic and are a vital step in acrylic application. Primers can be acid-based (contain methacrylic acid, also known as MAA), non-acid (contain small amounts of acid that is not MAA) and acid-free (contain no acid). While acidic primers can cause irritation and burning when they come in contact with the skin, all modern primers are safe and effective if used properly. “Less is more,” says Darlene Tewitz, global educator for NSI. She advises techs to allow the primer to dry completely before acrylic application or moisture can get trapped under the enhancement. “Keep in mind, primer can only do so much,” she says. “Failing to remove all cuticle, dust and oils from the nail first can contribute to lifting and contaminate your primer.”
RELATED: Create Ombré Nail Art with the Light Elegance Enchanted Forest Summer Collection

Form & Fit
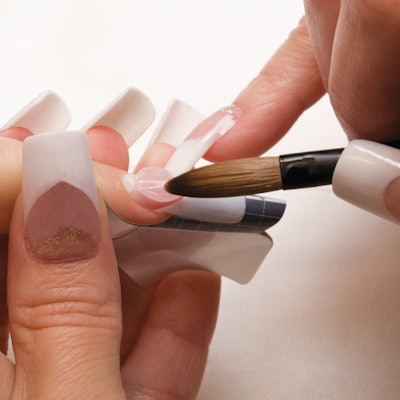
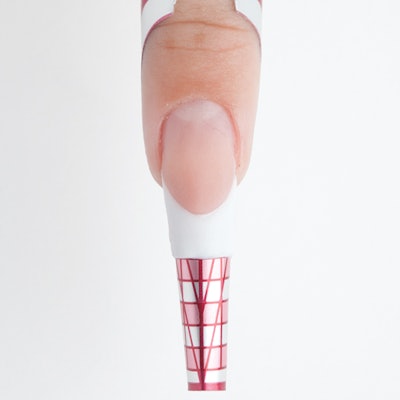
A badly placed nail form can impact the structure of the enhancement and its appearance. “When it comes to different shapes, it’s not about building the nails any way you want,” says Tewitz. “For the most part, forms go straight out, but for longer nails and different shapes, the forms should either tilt up or down.” Getting the right fit almost always requires some customization, says Burciaga. This can mean gently rolling the form to get a tighter c-curve, adding strength to the free edge area by sticking the center tab to the underside of the form or cutting a deeper well to accommodate deep sidewalls or an extended hyponychium. After the form is secure, check it from all angles to ensure it comes straight out from the nail’s growth channels and is snug under the free edge. If your client is especially fidgety, it may be necessary (and ultimately faster) to apply one form at a time to avoid reapplying a form that’s been knocked out of place.
Mix Ration
Most brands recommend a 2-1 ratio of monomer to powder; however, different brands can require slightly different ratios, so knowing your system and simply practicing often is important. “Not too wet nor too dry, the perfect bead will polymerize within a few seconds on the end of your brush, turning into a smooth, glossy pearl that keeps its shape,” says McPherson. “Color and glitter acrylics have a slightly different feel and appearance,” says Allie Baker, EzFlow global brand ambassador. Baker uses these powders only to add sparkle or designs to the top of the enhancement, building the structure with clear powder.
System Standard
Acrylic systems typically consist of a primer, liquid monomer and powder polymer, and these components are specifically engineered to work together. “Working within one system is optimal. When you mix systems, you’re taking a chance of service break down,” says Nail Career Education’s Suzie Moskal. In addition to lifting issues, mixing liquid from one system with the powder from another can result in an adverse reaction, leading to overexposure and skin sensitivities. “Using all the parts of a system is the only way to ensure that you’re using the products as they were intended by the manufacturer,” says Chelsea Baart, OPI global artist.
RELATED: Escape to Bali with Nail Designs Inspired by the Indonesian Island
Brush Breakdown
“The brush is such an integral part of the process—it’s an extension of the hand,” says Moskal. Choose a brush that holds the right amount of monomer for the system you’re using and produces the right size bead for the size and shape of the nail you’re creating. The larger the brush, the more monomer it can hold—which can mean fewer beads are required to sculpt a nail. Look for natural hair bristles, such as kolinsky, because they can withstand the solvent quality of monomer. When in doubt about which brush size to use, start with the size recommended by your system’s manufacturer. And if you’re new to acrylic, Burciaga recommends starting with a less expensive brush. “You’ll ruin quite a few!” she says.
Smile Line
Creating a perfect smile line is one of the most challenging aspects of acrylic pink-and-white application. Like most skills that are difficult to master, it takes time. “Practice, practice, practice,” says Cuccio director of global education Marilyn Garcia. Terry Nguyen, global educator for Kiara Sky, swears by the reverse technique. In this technique, the nail bed (or pink portion of a pink-and-white nail) is sculpted first. Since the bead is naturally rounded after it’s pressed into place, less swiping of the smile line is required. “After you create the pink, file around it to make the smile line crisp and really sharp,” says Nguyen. Then follow with the application of white acrylic on the tip. “You can apply the white without worrying about the smile line since it was already created with the pink,” says Nguyen. Once the nail is shaped and filed, the perfect smile line will be revealed. To achieve smile lines during a fill that are as good as the original full set, Garcia recommends filing off 50 percent of the existing product and a little more on the free edge.

C-Curve
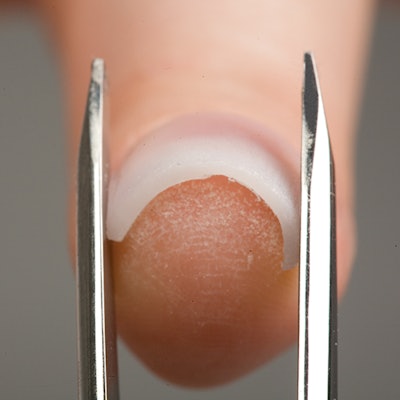
A properly executed c-curve improves the nail’s strength and transforms awkwardly flat extensions into beautifully-shaped nails. A good c-curve starts with proper form placement and can be improved by applying gentle pressure to the sides of the nail when the acrylic is no longer sticky, but still pliable. “Make sure to analyze your client’s natural C-curve to determine how much to pinch,” says Galdina Jimenez, OPI brand educator. “If she has flat nails then a slighter c-curve is best to prevent any damage.” C-curve sticks and pinching tools can help. “If you’re layering more acrylic on top, be sure to continue to pinch all the way through,” says Tewitz. Why? Because when you apply additional acrylic, the new acrylic will re-wet the already pinched nail and soften the product, thus relaxing it.
RELATED: Create a Marble-ous Nail Design with Christrio Nail Ink
Apex & Arch
“The apex is the area of the enhancement that has the most strength,” explains Kim Quay, global educator for Glam and Glits Nail Design. “It’s created by building and structuring the thickest amount of product over the nail’s stress area.” For most enhancements, the apex is located between the middle of the nail bed and the start of the natural nail free edge; however, the height and location should be adjusted depending on the nail length desired. For example, longer nails will require a higher, longer apex that is moved toward the free edge. Jimenez recommends building the apex with your first bead (adding additional beads if needed) and checking the profile of the nail to ensure proper placement. From the apex, the product should transition smoothly to the free edge and to the cuticle, forming the nail’s arch.
Allergic Reactions
The first indicator of an allergic reaction is red and itchy skin around the nail. “In my 32 years of doing nails, I’ve only seen two cases of an allergic reaction (and I was one of them),” says Jill Wright, licensed nail tech and coordinator of the Nail Tech Event of the Smokies. Allergies can be tricky because they can develop over time. “A client may be fine with acrylic enhancements for years and all of a sudden start to experience symptoms of an allergic reaction,” says Baker. Once an allergy has developed, it can’t be reversed. “All products must be gently removed, the fingernails cut short and not even nail polish applied until they heal,” says Wright. To reduce the risk of an allergic reaction, always follow the manufacturer’s instructions, use the correct liquid-to-powder ratio and keep product off the skin. If a reaction is severe, advise the client to seek medical attention.
File Finish
Filing an acrylic nail is a 3-D effort. This step not only achieves the client’s requested shape (stiletto, square, oval, etc.), but also removes unnatural bumps and ridges; blends product to the sidewalls, cuticle and free edge; and smoothes the finished shape. “A lot of technicians think that the shape comes in the filing, but nothing can be further from the truth,” says Tewitz. “Shaping starts at the beginning when sculpting the nails.” She starts her finish filing by creating parallel sidewalls, then blends the sidewalls into the natural nail, being sure to avoid the apex. “I work all the way around, from one sidewall to the cuticle line to the other sidewall,” she says. “When I’m happy with that, I take another smaller section above and repeat the steps until only the apex is left to file.” Graduating the file grit used is also important. Burciaga starts with a 100-grit file to take down excess product, and then shapes the nail with a 150-grit file, making sure to check the nail from all angles. She continues with a 180-grit file to smooth and refine the nail and finishes with a buffing block or 220-grit buffer.

E-File & Bits
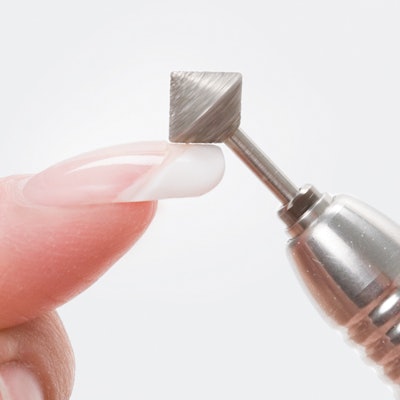
An electric file can be an invaluable tool for working with acrylic enhancements. “An e-file efficiently removes cuticle from the nail plate, which is key for preparation,” says Jimenez. “It also debulks product faster, relieving hand stress.” For optimum performance, however, e-file and bit maintenance is necessary. “New, good-quality bits will make the job easier,” says Jimenez. “Make sure to change them out immediately once they wear down.” Both Burciaga and McPherson reach for a ceramic safety bit to debulk product. “It creates less heat and helps prevent any accidental damage,” says McPherson. A mandrel is another valuable bit because sanding bands are available in a variety of grits and are replaced after every client. A bit designed for use under the free edge ensures that the area is clean, smooth and free of any product. However, before reaching for an e-file, make sure that you’re properly trained in its use, otherwise you risk imparting damage to your clients’ nails.
Yellowing & Crystallization
“Yellowing is usually caused by one of three reasons: Touching an acid-based primer to existing product, exposure to UV tanning beds or old enhancements,” explains McPherson. It can also be caused by contaminated monomer, adds Baker. Avoid yellowing by making sure that your product is kept free of debris and out of UV lights and use an acid-free primer (or apply acid-based primers very carefully around existing product). Crystallization used to be common when the environment was too cold, but it’s an infrequent occurrence today. “Most quality acrylic won’t crystallize when used according to the instructions,” says Baker. To be safe, use and store acrylic products at the temperatures recommended by the manufacturer and keep products away from sunlight.
Lifting
Improper natural nail prep or improper application is the cause of most lifting. Always make sure that the nail is a clean canvas, free of oil, debris and cuticle, and remove the shine if your system requires it. Improper application can include many things, from using too much primer to applying product too wet or too dry or getting acrylic on the cuticles and sidewalls. Also, thick product that isn’t adequately blended, especially at the perimeter of the nails, can cause premature lifting. “The natural nail is flexible,” says Baker. “If the coating being applied is too thick, it’s also too rigid to flex with the natural nail, causing the two to separate.
Right Removal
“Rushing removal or picking off enhancements is the best way to damage the natural nail,” says Baart. “Take time and care when removing any enhancement. It’s our job to ensure that clients leave with their nails in better condition than when they came in.” Indeed, improper removal is largely responsible for the common misperception that acrylic nails damage natural nails. Before reaching for the acetone, McPherson carefully removes as much acrylic as possible with an e-file, making sure to never touch the nail plate, skin or cuticle with the bit and always checking for heat on the nail. Solvents are more effective with the addition of safe heat, so after placing acetone-soaked cotton on each nail, wrap the fingertips in foil (which takes advantage of the client’s own body heat) or use warming mitts or a warm towel to speed up removal time. Allow the nails to soak for 10-30 minutes, and then gently scrape the softened acrylic off the nail with an orangewood stick. “If stubborn acrylic remains, reapply acetone and repeat the soak and scrape,” says McPherson. “This can be a time-consuming and somewhat tedious process, however it’s the only safe way of removing acrylic and preserving the health of the natural nail.”
–by Leslie Henry
[Images: Getty Images]


