Master the art of stamping in seven simple steps!
Intricate nail art with crisp, fine lines once required awe-inspiring freehand skills and a lot of time. Now, any tech can instantly achieve impressive nail art with stamping, a technique where nail polish is embedded in the grooves of an engraved design and then transferred onto the surface of the nail using a stamper. With practice, “it’s a quick and easy way to make nails look amazing with little time and effort,” says Melissa Fisk (@lissamel9), a nail artist who specializes in stamping and the creator of nailrotica.com.
Stamping requires three basic tools: stamping plates, a scraper and a silicone or rubber-tipped stamper. Stamping plates are made of thin steel and are usually etched with several images per plate. Designs range from small accents to fancy French tips to detailed patterns that cover an entire nail. In general, plates that are etched deeply make the cleanest images. If you’re new to stamping, Fisk recommends avoiding designs with very fine details at first. Small details can dry out quickly and won’t transfer well if you don’t work fast enough, says Fisk. Also, size matters. If some of your clients wear long enhancements, be sure to get plates with designs that are large enough to cover the nails.
Scrapers and stampers come in a variety of shapes, sizes and materials that vary in firmness and flexibility. “Selecting the right tools requires some trial and error,” says Fisk, who notes that specially formulated stamping polishes are a great option for beginners, but technically you can use most polishes to stamp (except glitter, as it gets stuck in the plate). Fisk prefers opaque colors in cream, metallic and holographic finishes. “The polish shouldn’t be too thick or too thin. You’ll need a medium consistency for a polish to stamp well.” What’s more, the technique requires speed and precision—which takes a lot of practice. Don’t give up, says Fisk. Soon you’ll be ready to tackle (and charge a premium for!) advanced stamping techniques, such as custom decals and double processing. Here, how to achieve the perfect stamp, step-by-step.
How to Successfully Master Nail Stamping
1. Before you begin, make sure everything you need is within easy reach. In addition to a stamping plate, stamping polish and scraper, you’ll need a paper towel, cotton balls or pads, polish remover, tape and quick-dry top coat.
2. Polish nails with the base color and apply two coats of a quick-dry top coat. Top coat reduces the time you have to wait before stamping and makes it easier to fix mistakes later, if necessary.
3. Hold the stamping plate in place on a flat surface and paint the polish over the chosen design. Using the scraper, immediately scrape over the polish at a 45-degree angle to remove the excess lacquer from the plate. After scraping, the wet polish should completely fill the grooves of the design and the plate’s surface should be clean.
4. To lift the image from the stamping plate, roll the stamper across the design in one smooth, firm movement. It takes practice to get the right pressure—apply too much and the polish can squish from the grooves; apply too little and you’ll end up with bare spots in the design. Be careful not to lift or slide the stamper across the plate as you work.
5. Position the stamper over the nail so the design is aligned properly. (Note: This is especially important when stamping French tips or patterns that must be centered.) Again, using one smooth motion, press the stamper onto one side of the nail and slowly roll it to the other side to transfer the design. Again, you’ll need to work quickly! Within roughly two seconds, the polish on the stamper will begin to dry and the design won’t transfer completely. When finished, if any dried polish remains on the stamper or in the grooves of the plate, clean them before moving on. TIP! Wipe the scraper on a paper towel right away so it’s clean for the next nail.
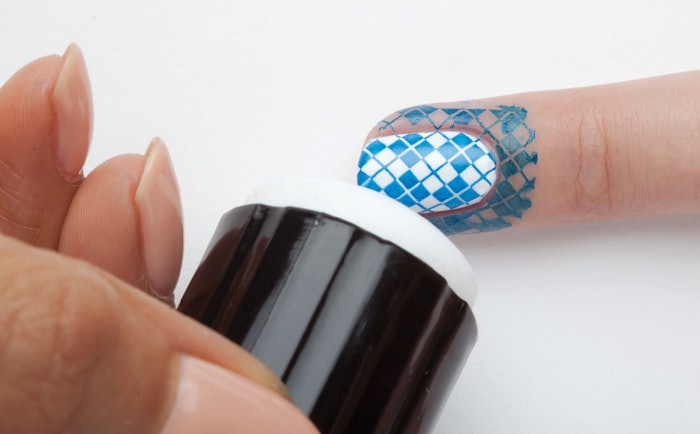
6. Use the sticky side of a piece of tape to remove polish residue from the stamper before continuing. Repeat the process on the rest of the nails. Then, clean up any part of the design that transferred onto the skin.
7. Carefully seal the design with top coat. Use a light touch and float the top coat over the nail to prevent smudging the design.
Ooops! Here’s How to Fix a Nail Stamping Mistake
Incomplete transfers, smeared polish and crooked or warped patterns can be stressful when your next appointment is waiting. Fortunately, it’s not always necessary to re-polish the nail from scratch. First, improve your chances of fixing a mistake without starting over by avoiding base color polishes that require three or more coats. Then, always follow with two coats of quick-dry top coat, giving them ample time to dry completely before stamping. The hard, glassy finish will act like the surface of a dry erase board, allowing you to remove a bad stamp without ruining the polish underneath.
A disposable, sticky lint roller gently rolled over the nail’s surface is sometimes enough to pick up a less-than-stellar transfer. Tape works, too! For a stubborn stamp, try lightly rubbing the nail with a lint-free pad soaked with a small amount of non-acetone polish remover. After removing the offending design, refinish with top coat and you’re ready to stamp again.
-Leslie Henry of workplaypolish.com ; nails by Karen Gutierrez (@karengnails)
This piece was originally published by Nailpro in 2015.


